IGetMail - Troubleshooting
IGetMail cannot connect to one of our remote POP3 servers.
- When IGetMail cannot connect to one of your remote POP3 servers, you need to check the name of remote POP3
server and your login credentials.
- Run IGetMail and go to the Accounts panel.
- Select the Account that IGetMail is indicating that it cannot make a connection to. Look for the red
envelope icon next to the Account name.
- Press Modify.
- Press the Test Login button.
- If the Test Login indicates that it cannot connect, then you need to review the name of the POP3 server for
errors. You may need to contact your email provider to find out the exact name of the email server that is
holding your email account. You may also experience this problem when you have a firewall that blocks
outbound POP3 traffic. If you have a firewall, you need to open Port 110 for outbound TCP.
- If the Test Login indicates that it successfully connected to the POP server, but it cannot login,
then you need to review your User Name and Password information. If you
believe you have typed in this information into IGetMail correctly, you may
need to contact your email provider to make sure your email account is still
active, and still on the same server. Sometimes we have found that the
email provider moves the email accounts around and you may need to adjust
your settings accordingly.
- Use the Test Login to perform tests until you have successfully provided IGetMail with the information it needs
to connect and login to your remote POP3 email account.
- Once you have a successful connection and login, press OK to save your changes.
IGetMail
cannot connect to the local SMTP/Exchange Server.
- When IGetMail cannot connect to your local SMTP/Exchange Server, you need to check the name of SMTP Server and
your login credentials.
- Run IGetMail and go to the Accounts panel.
- Press the Modify SMTP Settings button.
- Press the Test Login button.
- If the Test Login indicates that it cannot connect, try this first. If you have a firewall or anti-virus
software that has worm protection, Port 25 is probably blocked. In our experience A LOT of anti-virus programs
block Port 25 outbound. So, given this we recommend that you check your firewall and/or anti-virus software
and change their settings to allow outbound SMTP traffic on Port 25. Please check with the manufacturer of
your firewall and/or anti-virus program for instructions on how to change the settings to allow for the
outbound SMTP traffic on Port 25.
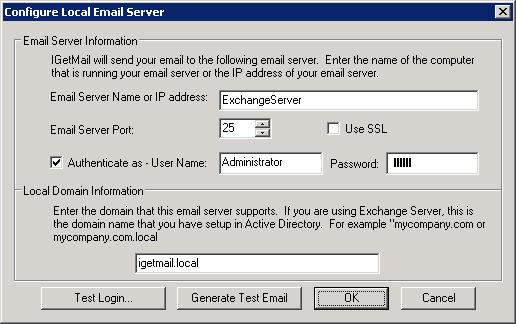
- Another common problem that prevents IGetMail from connecting to your local SMTP/Exchange Server occurs when
your local SMTP Server is configured to disallow anonymous access. If your local SMTP Server is configured to
required authenticated access, then you need to check/tick the "Authenticate as" option on the
Configure Local EMail Server dialog within IGetMail. Once you have checked this option, be sure to enter a
User Name and its associated Password. Typically, for Exchange Server users, you will want to use a Windows
Account that is part of your Active Directory that has the right to login to the Exchange Server.
- Lastly, verify that name of the local SMTP/Exchange Server that has been typed into IGetMail on the Configure
Local Email Server dialog is the name of the computer at your location that is running your copy of Exchange.
Typically, this is not the ISP hosting the POP accounts, so be sure to enter the name of your local Exchange Server
on this dialog.
- Use the Test Login to perform tests until you have successfully provided IGetMail with the information it needs
to connect and login to you local SMTP/Exchange Server.
- Once you have a successful connection and login, press OK to save your changes.
We are not receiving our email - does IGetMail have
any size limitations?
IGetMail has no file size limit and does not differentiate
based on file size or the presence of attachments. So when you are having
trouble receiving large emails or emails with attachments - the problem is not
with IGetMail. You have 2 common things to check on that have email limits
- your Exchange Server and any antivirus/antispam software that is running on
the Exchange Server.
Exchange Server does limit the size of incoming messages and
it does so within multiple locations of your Exchange Server settings. The
limitations within Exchange Server are the most likely reason why you are not
receiving large messages and/or messages with large attachments.
By default, Exchange tends to limit messages to not more than
5 MB of total size. The 5 MB is the size of the header, plus the body, plus any
attachments. Please note that all attachments are not the problem - this is
simply a matter of overall message size going over Exchange's limit. Exchange
places limits on the connectors (SMTP), transports, mailboxes, and mailbox
stores. Microsoft provided flexibility by allowing you to control all of these
separately; but as a result, you have to change all of these size limits before
you have success in changing the incoming email limitations. In other
words, you have only found one or 2 size settings, you still need to change
more.
If you have anti-spam/antivirus program(s) running at the
Exchange Server, it is common for these applications to have file size limits as
well. So you need to look at the Administrator panels of these programs
and change their file size limits as well. Also, be aware that some Firewalls
have anti-virus software built-in. You may need to check the settings of
your Firewall to see if it has an anti-virus program that has limitations on
message or attachment sizes.
IGetMail cannot download a large message or a message with an attachment from a
remote POP Server.
IGetMail has no file size limit and does not differentiate
based on file size or the presence of attachments. So when you are having
trouble downloading large emails or emails with attachments - the problem is not
with IGetMail.
The typical causes of this problem are limitations at the POP
Server or features in your firewall. Some POP Servers have an antivirus and/or
antispam program that scans the messages as they are downloaded. Some of
these antivirus programs installed on POP Servers have problems with large
files. As a result, the antivirus or antispam program at the POP Server may
interfere with the process of downloading the large email message to your
location. When this occurs, you will need to contact your POP Server provider
because the problem is with their server.
Another common "feature" of some firewalls is sometimes called
"intrusion prevention" which is marketing-speak for "load detector." Some
firewalls, when they see a large amount of data that goes through a single
connection, they consider this an attack and they close the connection.
This is typically what the firewall manufacturers call intrusion prevention - in
other words they are looking for unusual load and when it happens, they cut it
off. The problem is, sometimes email arrives that is quite large and
unusual compared the the rest of the mail you get. There's nothing wrong with
this, it just arrives randomly and happens to match the firewall vendor's
threshold detector and gets cut off. To prevent this, you can take a look
at the firewall settings and see if you can turn off the intrusion prevention or
modify the settings to allow for your large email to go through the firewall.
IGetMail is downloading our email, but it does not show up in our mailboxes.
- When IGetMail is downloading your email,
but the email is not showing up in your mailboxes, you need to check both
your POP Account settings and your local SMTP/Exchange Server settings. The
most likely cause of this problem happens when the Internet information has
been accidentally entered as your local SMTP/Exchange Server information.
- Let's check your local SMTP/Exchange Server settings first. Go to the Accounts panel.
- Press the Modify SMTP Settings button.
- In the upper half of the screen, the top item needs to be the name of
the computer running Exchange or the Internal IP Address of your Exchange server.
The key item here is this is your internal computer name.
- In the lower portion of this dialog in the section called Local Domain
Information, verify that you have entered the domain that is supported by
your local, internal, SMTP/Exchanger Server. In the case of Exchange, this
is your Active Directory domain. It is very common for your Active
Directory domain to NOT match your Internet domain. For example, your
Active Directory domain most commonly looks like: MyCompany.Local. Note
that this is different than commonly formatted Internet domains, like
MyCompany.Com. To verify your Active Directory domain, go to your Domain
Controller. Press Start>All Programs>Administrative Tools>"Active Directory
Users and Computers." Look at the column on the left and read the
highlighted domain name. Make note of this domain name and type it into
IGetMail so both names match.
- Press the Generate Test Message button to send a message to one of your
email addresses to see if you receive it. If you do not receive the Test
Message, you need to review your SMTP/Exchange Server settings again. If
you receive the Test Message but you are not receiving the emails from your
remote POP Account, we need to look at your POP Account settings.
- At the Accounts panel, highlight the name of a POP Account for which you
are not receiving the messages and press Modify.
- At the Configure Remote POP3 Accounts dialog, press Next.
- At the Configure Remote POP3 Accounts - Account Type screen, you need to
review your settings for a potential error.
- If you have configured this POP Account as a "Catch All" account,
highlight the name of a Domain in the list. Press the Modify Domain
button. The most common error in Catch All accounts is either the Domain
Name does not match your Internet domain or that you need to use the
"Translate the email addresses..." option in the Domain Mapping portion of
the dialog. First, review the Domain Name provided at the top of this
dialog. Make sure this matches your Internet Domain name. This should be
everything to the right of the @ sign when someone sends email to your POP3
account. For example, you have registered MyCompany.Com as your Internet
domain. Enter "MyCompany.Com" into this field. Note that this does not
include the @ sign. The second item to check is the Domain Mapping option.
If you local SMTP/Exchange Server is configured to support a different
domain that the Internet domain that you have provided above, you need to
use the option "Translate the email addresses..." For example, if you use
Exchange Server and your Active Directory is setup to use MyCompany.Local,
you will need to select the "Translate the email addresses" option. In this
case, IGetMail translates the MyCompany.Com addresses to MyCompany.Local.
Without this translation, Exchange will forward your mail back to the
Internet and Exchange will not keep a copy.
- If you have configured this POP Account as an "Individual" account,
verify that the email address typed into this dialog is an address that is
exists at your local SMTP/Exchange Server. For example, MyUserName@MyCompany.Local.
Note, this address may not be your Internet address that you most commonly
provide to people so they can send you email. It needs to be the email
address that is present in the Active Directory for one of your Windows
users.
- Once you have made any corrections as described in Steps 9 and 10 in
this section, press Next and Finish to save your changes.
- At the Downloaded Email panel, select the messages that IGetMail has
downloaded, but you have not received. Press the Redeliver button.
IGetMail will re-deliver the mail, applying the new settings you have
specified in Steps 9 and 10 in this section. Remember that you can select
the first message and shift-select the last message to select a range of
messages.
- At the Accounts panel, press the Check for New Email button.
Notes About Exchange 2007 and Newer Versions:
Exchange 2007 and newer versions have increased security with the intent to stop
spammers relaying through these servers, as a result sometimes Exchange will
falsely think IGetMail is relaying and thus cause the email to fail to make
it to the intended recipient. The solution is to use authenticated SMTP and
make sure that the Windows account you use for authentication (which may not
be the accounts receiving the email) is a member of the Exchange Servers
Group.
- Run the Exchange System Admin.
- On the left hand panel expand “Server Configuration”.
- Then under Server Configuration click on “Hub Transport”.
- Then in the middle panel of the Exchange System Admin, in the lower half you will see a
list of Receive Connectors. Double click on the “Default - <Server Name>”
connector to go to that connectors properties.
- Next go to the Authentication tab on the connectors properties dialog.
- On the Authentication panel, under the section “Basic Authentication”, uncheck /
untick the option “Offer basic authentication only after starting TLS”. So
this option is not checked, but Basic Authentication is checked. What this
will do is not require an SSL/TLS connection before allowing authentication.
Otherwise Exchange will not offer authentication unless the client
(IGetMail) is connecting through SSL/TLS. Note that IGetMail supports SSL/TLS but
you need certificates at the Exchange Server for Exchange to become an SSL/TLS
Server. Certificates are not required at IGetMail’s side (SSL/tLS Client, which
is why end users do not need certificates to use a browser to connect to a
secure server).
- Apply your changes.
Next you need to tell IGetMail to connect to your Exchange Server using
the Windows Account that is a member of the Exchange Servers group in Active
Directory.
Exchange will allow this user account to send email to all other users.
Click here for step by step screen shots.
IGetMail is downloading our email, but large messages or messages with large
attachments are not showing up in our mailboxes.
IGetMail has no file size limit and does not differentiate
based on file size or the presence of attachments. So when you are having
trouble receiving large emails or emails with attachments - the problem is not
with IGetMail. You have 2 common things to check on that have email limits
- your Exchange Server and any antivirus/antispam software that is running on
the Exchange Server.
Exchange Server does limit the size of incoming messages and
it does so within multiple locations of your Exchange Server settings. The
limitations within Exchange Server are the most likely reason why you are not
receiving large messages and/or messages with large attachments.
By default, Exchange tends to limit messages to not more than
5 MB of total size. The 5 MB is the size of the header, plus the body, plus any
attachments. Please note that all attachments are not the problem - this is
simply a matter of overall message size going over Exchange's limit. Exchange
places limits on the connectors (SMTP), transports, mailboxes, and mailbox
stores. Microsoft provided flexibility by allowing you to control all of these
separately; but as a result, you have to change all of these size limits before
you have success in changing the incoming email limitations. In other
words, you have only found one or 2 size settings, you still need to change
more.
If you have anti-spam/antivirus program(s) running at the
Exchange Server, it is common for these applications to have file size limits as
well. So you need to look at the Administrator panels of these programs
and change their file size limits as well. Also, be aware that some Firewalls
have anti-virus software built-in. You may need to check the settings of
your Firewall to see if it has an anti-virus program that has limitations on
message or attachment sizes.
IGetMail is downloading our email and delivering the email, but the email
messages are arriving slowly.
If some of the emails are arriving at your Exchange
Server, but it is taking a while for the messages to arrive, this usually
indicates that you have an anti-spam or anti-virus program installed on your
Exchange Server that is allowing some messages to go through while blocking
other messages.
In this case, the blocking process is causing more
messages to build up in IGetMail that cannot be delivered. IGetMail will re-try
these messages for up to 3 days. The process of re-trying the messages slows
the overall delivery of mail.
You can check to see if messages are being rejected by
your Exchange Server by opening IGetMail and go to the Downloaded Email panel.
Take a look at the status column and see if messages are listed as failed to
deliver, or message failed to deliver retry scheduled. If you see messages
that are listed as failed to deliver, then IGetMail will automatically retry to
send that message for up to 3 days. Each retry takes time and if you have
a lot of messages listed as "failed" these retry attempts are taking up time in
the queue which is why your email looks like is has slowed down.
To solve this problem, you need to clear out this
"failed" message queue. The easiest way to do this is to change your
settings on your anti-virus or anti-spam program to accept the message and
process it with the anti-spam / anti-virus program instead of rejecting the
message. For example, some anti-virus programs can accept the message and
place it inside a quarantine so the message is not delivered to Exchange;
however, since the message has been accepted, IGetMail can immediately declare
the message as delivered and therefore, failed messages do not build up in the
IGetMail queue.
IGetMail is reporting it cannot send messages to the email
server - How do I fix this?
The most likely cause of this error is when Authentication
is not setup correctly. To properly setup Authentication, you need to make
sure you have BOTH Exchange and IGetMail configured to use authentication.
Let's go through the process of setting up Authentication on the Exchange Server
first, and then we will follow up with the steps you need to take inside of
IGetMail. As implied, this is a 2-step process, one process occurs on the
Exchange side and the second on the IGetMail side. STEP 1 - Verify that
your Exchange Server is configured to all for Authenticated Login.
- Open the Exchange Management Console, expand Server
Configuration, and select Hub Transport.
- In the middle section of the Management Console you will see the
list of Receive Connectors.
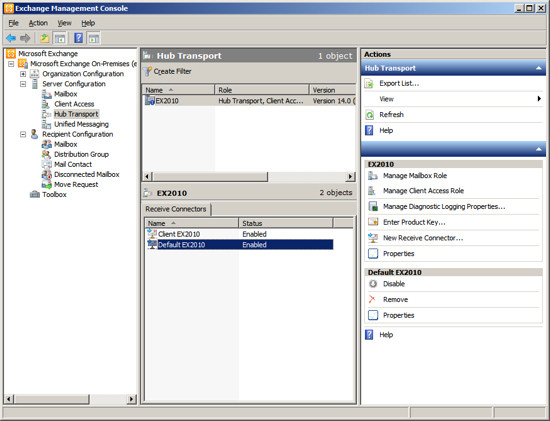
- Right click on the Receive Connector "Default ServerName" and
choose Properties, and select the "Authentication" tab.
- If you do not have an SSL certificate from a third party SSL
provider, then Uncheck / Untick the option "Offer Basic
authentication only after starting TLS". By default, Exchange will
not allow users to authenticate until you have an SSL certificate.
Unchecking / Unticking "Offer Basic authentication only after
starting TLS," allows Exchange to offer Authenticated login over
standard SMTP. After making any needed changes, press OK. You
are now done with double-checking your Authentication settings in
Exchange Server.

STEP 2 - Configure IGetMail to login to your Exchange Server using a
Windows Account that is a member of the Exchange Server's Group.
- Run IGetMail and at the Accounts Panel, press the "Modify SMTP
Settings" button at the bottom of the opening screen.
- Check / Tick the option "Authenticate as - "
- Enter the Name of a Windows User Account that you want IGetMail to
use to connect to the Exchange Server. This Windows account must
have a mailbox in Exchange and must be a member of the "Exchange
Servers" group. The key point here is that this account
is used to establish TRUST between IGetMail and Exchange.
Exchange Server wants a TRUSTED ACCOUNT to send it email.
Please note that this is not necessarily the account associated with
people who will receive email. It is usually the Administrator
account, because Exchange Server considers the Administrator to be a
TRUSTED source. Once you enter a trusted account, then
IGetMail will be granted the right to send email to ANY of your
Exchange Users.
IGetMail is now configured to send TRUSTED (in other words -
Authenticated) email to your Exchange Server.
We are receiving our email, but the sender receives a non-delivery message.
- Some ISP and email providers add additional
information to your email addresses as they process your email. IGetMail
interprets these modified email addresses as extra email addresses and will
CC these "recipients." Your local SMTP/Exchange server will see these
modified email addresses created by your ISP or email provider as non
existent addresses and sends a notice to the sender. In other words, when
you have this problem, you are receiving email and the person who sent you
the message receives an error. To fix this problem you need to tell
IGetMail to remove the extra information that your ISP or email provider is
adding to your email addresses.
- Go to the folder where IGetMail is storing its configuration data and
downloaded email. The default location is either the folder "d:\IGetMail
Data" where d: is the largest drive, if you have more than one drive
partition. Or if you have just one drive, the default location is under the
"Data" folder under the folder where IGetMail is installed, the default
location is "C:\Program Files\Lockstep\IGetMail\Data".
- Double click on the file "IGetMail SMTP Trace Log.txt" which will load
the file into Notepad.
- Look for the text "RCPT", this stands for Recipient. The Recipient
(RCPT) entry shows the actual email address that was processed by
IGetMail. Review several of the addresses and see if there are addresses
with a common phrase preceding your addresses. These phrases are commonly
in the form of "ExtraText-YourAddress@YourDomain.com". This extra text has
been added to your email address by your ISP or email provider..
- Run IGetMail and go to the Rules panel.
- At the Rules panel press the Add button.
- At the "Rules - Tasks that you want IGetMail to perform" dialog, select
the lower option "Remove Extra Delivered To information".
- Enter the text that appears before your email addresses from step 4
above. Be sure to include the dash if your ISP or email provider has placed
a dash between their added text and your email addresses.
- Press OK to save your changes.
We are receiving our email, but the Postmaster receives a non-delivery message
for every message downloaded.
- Some ISP and email providers create email
addresses that they use when they move your email through their own
servers. When your ISP or email provider creates new email addresses to
manage your email at their servers, these email addresses appear as a CC to
IGetMail. When IGetMail pulls the email it will CC your email to the
addresses that your ISP or email providers has invented. This can cause
your local SMTP/Exchange server to report that it could not deliver the
email to all of the recipients. You can instruct IGetMail to ignore these
extra email addresses.
- Go to the folder where IGetMail is storing its configuration data and
downloaded email. The default location is either the folder "d:\IGetMail
Data" where d: is the largest drive, if you have more than one drive
partition. Or if you have just one drive, the default location is under the
"Data" folder under the folder where IGetMail is installed, the default
location is "C:\Program Files\Lockstep\IGetMail\Data".
- Double click on the file "IGetMail SMTP Trace Log.txt" which will load
the file into Notepad.
- Look for the text "RCPT", this stands for Recipient. The Recipient
(RCPT) entry shows the actual email address that was processed by
IGetMail. Review several of the addresses and see if there is a common
address that is being added to your email messages that seems to relate to
your account at your ISP or email provider. For example you may see an
email address created that is in the form "YourAccountAtYourISP@YourDomain.com".
If see an address that is repeated in every message that appears to be
invented by your ISP or email provider, you can tell IGetMail to ignore the
address by following the steps below.
- Run IGetMail and go to the Rules panel.
- At the Rules panel press the Add button.
- At the "Rules - Tasks that you want IGetMail to perform" dialog, select
the upper section "Change the way IGetMail delivers your email...".
- In the drop down list immediately after the phrase "When the email
message's," select the phrase "To address". Then enter the complete email
address that you have seen in step 4 above. This should be the complete
email address that appears to be created by your ISP or email provider.
- On the next line after the phrase "perform the following action" choose
the option "Ignore this address". This instructs IGetMail to process the
message and send it to all of the addresses the message is intended for
while ignoring the address(es) that is/are being added by the ISP or email
provider.
- Press OK to save your changes.
Does IGetMail keep any Logs?
IGetMail creates two types of logs. One log
records recent communications between IGetMail and your POP3 Accounts.
Another log records recent communication between IGetMail and your local
SMTP/Exchange Server. The logs record recent activity up to 500K and are
automatically maintained by IGetMail so you do not need to worry about these
logs growing in size over time.
I
see a RED icon on the Accounts Panel - How do I fix this?
Red icons indicate that either the POP Account Server or the Exchange
Server cannot be accessed and IGetMail is not downloading email. When you
see a red icon, you need to take corrective actions to return the icon to green.
If you see a Red icon in front of one of your POP Account listings - the most
common reason for this problem is that you have either accidentally included
incorrect information in your POP3 Account configuration information that you
provided to IGetMail - OR - your login credentials (User Name and Password) to
your POP Account have recently changed and you need to input these changes into
IGetMail also.
Click here to read the steps about modifying your POP3 Account configuration.
If you see a Red icon in front of the listing for your Exchange Server in the
lower portion of the Accounts Panel, chances are that there have been some
recent changes to the configuration of your Exchange Server. Common
reasons for a red icon in front of your Exchange Server are: a recent change in
the name of the computer running Exchange; a change in the computer IP address;
or if a firewall has been installed may be cutting off access to the Exchange
Server; or a change in the login credentials. Again, if you see a Red
icon, press the Modify SMTP Settings button, then review your current settings
and make any changes as needed. Press the Test Login button to verify
IGetMail's access to your Exchange Server.
I
see a RED icon on the Downloaded Email Panel - How do I fix this?
Red icons in front of messages in the Downloaded Email Panel indicate
that IGetMail downloaded the messages but the messages could not be delivered to
the proper recipient after 3 days of trying.
If you see a Red icon in front a message in the Downloaded Email Panel, you can
choose to redeliver these messages or forward to another recipient if appropriate.
How
can I move IGetMail to another computer and retain my settings?
IGetMail stores the account information, downloaded emails, preferences, etc
in a folder that you specify when you installed the program originally. This
folder location is stored in a configuration file. To move the IGetMail program
and its data, follow these steps.
Step 1 - Stop the IGetMail Service
- Go to the computer running IGetMail
- Right click on My Computer and select Manage.
- At the Computer Management window, expand "Services and Application"
and then highlight "Services".
- The right hand panel will now show all of the installed services.
Scroll the panel on the right until you see the service named "IGetMail
".
- Right click on the service and select Stop.
Step 2 - Create a new location on the new server to hold the existing
IGetMail data.
Go to the new server and create a folder that you want to use to hold the
IGetMail data. You need to either create a folder or have an existing folder
to use, DO NOT use the root of the hard drive. For example
create a folder named "d:\IGetMail Data".
Step 3 - Move the existing data.
- Go to the old computer where IGetMail is already installed.
- Go to the folder where IGetMail is installed, the default location
is “C:\Program Files\Lockstep\IGetMail” or for 64 bit Windows
"C:\Program Files (x86)\Lockstep\IGetMail".
- Double click on the file named “IGetMailConfig.ini”, this will load
the file into Notepad.
- You will see a section titled [Archive], under this is a line that
starts with “Path=”. The path that is after the Path= is where IGetMail
is storing its configuration files and downloaded email.
- Go to the path listed in the IGetMailConfig.ini file.
- At the IGetMail Data path copy all of the files and folders from the
current IGetMail data folder to the new folder you created in Step 2
above. Specifically copy the IGetMail data from the old server to the
new.
Step 4 - Install IGetMail at the new server and uninstall from the old
- Go to the new server
- Run the IGetMail setup program.
- When you run the Setup Program it will ask you where you want to
store the IGetMail data, you should enter the path you created in Step 2
above. This is the folder that you have already copied your IGetMail
data to.
- Complete the setup.
- IGetMail will use the configuration, downloaded email, etc that is
copied to the new server as is. It will just continue along from the
point of where IGetMail stopped on the old server.
Step 5 - Finally uninstall IGetMail from the old server.
- Go to the old server
- Go to Control Panels and run “add and remove programs”.
- Choose IGetMail and uninstall the IGetMail program.
- The IGetMail uninstall program will ask if you want to delete the
data, choose no for now to leave the data. If everything is ok then you
can delete the old data by hand later.
Now IGetMail should be running normally on your new computer with all of the
settings, downloaded email history and license information intact.
All my IGetMail Accounts have disappeared and my settings have cleared - How do
I fix this?
IGetMail stores the account information, preferences, configuration data and
license details at the storage location you specified when you originally
installed IGetMail. If the any of this information is suddenly missing or
cleared the implication is that IGetMail is having a problem accessing the
storage location. We commonly find this happens when a USB drive is used as the
storage location and the USB is unplugged or reformatted; or the IGetMail
storage location is accidentally deleted by someone who does not realize that
this data is necessary for IGetMail to operate.
Step 1 - The first step in fixing this issue is to reset the IGetMail
service.
- Go to the computer running IGetMail
- Right click on My Computer and select Manage.
- At the Computer Management window, expand "Services and Application"
and then highlight "Services".
- The right hand panel will now show all of the installed services.
Scroll the panel on the right until you see the service named "IGetMail
".
- Right click on the service and select Stop.
- Repeat and select Start.
Now open the IGetMail Admin and see if the accounts are present and all other
configuration data is back to normal. If you see the account list, then
resetting the service was all that was needed.
Step 2 - If the account list is still empty then you need to look at the
storage location as follows:
- Go to the folder where IGetMail is installed, the default location
is “C:\Program Files\Lockstep\IGetMail” or for 64 bit Windows
"C:\Program Files (x86)\Lockstep\IGetMail".
- Double click on the file named “IGetMailConfig.ini”, this will load
the file into Notepad.
- You will see a section titled [Archive], under this is a line that
starts with “Path=”. The path that is after the Path= is where IGetMail
is storing its configuration files and downloaded email.
- Go to the path listed in the IGetMailConfig.ini file.
Look at the location referenced above and see if there are any problems
accessing this location. For example, if the location specified in the INI
file is a drive that is not currently plugged in or operational, you need to
plug the drive in or determine what is the failure of the storage drive and take
corrective actions.
|